My First Open Source Contribution
How I got my first pull request merged as an open source contributor in kaggle-cli.
On this page
You must have heard about open source, right? It may sound a bit intimidating as well. It was the same for me as well, when I got to know about it.
Whether you’re a high school student, undergraduate, or post graduate student or even a professional working in any domain. You can start contributing in open source projects, at any point of your career.
To most of us, it may sound like it’s a bit too late start contribution. That’s the kind of voice that comes in everyone’s mind at some point. But believe me, it is never late to learn anything. I did my first open source contribution after my Bachelors degree.
And once you start doing something meaningful, it compounds.
Many of you might still not fully understand the concept of open source. So, let me quickly tell you about it in short.
What Is Open Source?
Well, as the name suggests - the source, which refers to the original codebase written by the author or collaborators is open to all. Anyone can see and copy the source code, and even edit the codebase.
The distribution rights are as per the license of the project. You need to understand the different kinds of licenses as well. They tell you what you can do with the code of that project.
If you are already using github to save and deploy your projects, you might already be familiar with the terms that we just discussed.
How I Contributed to kaggle-cli?
If you are new to open source and want to contribute, this is the exact part you need right now.
I have been participating in competitions and hackathons held on Kaggle. Since, we need to do many experiments and create multiple jupyter notebooks during the course of competition, I wanted to keep a track of everything that I do along with the entire codebase.
Then I found kaggle-cli, the command line tool to manage the kernels and datasets on kaggle servers.
It sits perfect with my approach, so I started using it. Duing one of my competition file submission, I got error multiple times, but the error prompt was confusing and was not helping me, as a user. So, I thought someone else might be facing the similar problem as well.
I searched the issues on kaggle-cli but couldn’t find a similar issue. After that I tried to trace the problem in their codebase and found the exact logic error regarding why the unintended API requests were sent to the Kaggle backend.
I raised an issue that you can see here kaggle-cli #1182. At the same time I was creating a solution as well, and opened a pull request kaggle-cli #1183.
It takes times to get a response because the maintainers of the repository may be from different countries. You just need to be patient and wait for a response. If you don’t hear back from the maintainers in a few days, you can follow back in your issue or give an update regarding your progress if you made some solution in the mean time.
The maintainers or other contributors can comment and tell you to improve something before your PR can be merged or anything relevant to the issue.
In my case, I created the PR but didn’t go deep enough to prevent the invalid inputs from reaching the Kaggle’s backend. One maintainer mentioned this and then I fixed it. They reviewed it again and then merged into official kaggle-cli.
This was the whole process that I did as my first open source contribution - from finding the issue, opening issue and pull request on kaggle-cli, discussion with maintainers, improving the PR, till it finally got merged.
What Helped Me Do It?
Since, I have been using the kaggle-cli personally, I knew how it worked from inside out. It helped me pinpoint the error and debug quickly and accurately.
It does not mean that you can not contribute to projects that you have not been using for long. But it is also true that you need to understand about the project and its architecture. This may take some time but you can accelerate it using AI. It will help you understand the architecture of the project much faster.
Once you have have confidence you can start to debug and create your own solution and create pull requests.
One thing that you may need to be aware of is that certain repository have strict rules like if you are creating a complex solution, you need to first explain and discuss with the maintainers or exisitng contributors before creating a PR.
So, before creating any PR, just go through the CONTRIBUTING.md file in the project repo.
The Basic Flow Of Contribution On GitHub
While every repository may have its own specific guidelines in their CONTRIBUTING.md, the standard Git and GitHub workflow for contributing to an open source project follows these core steps:
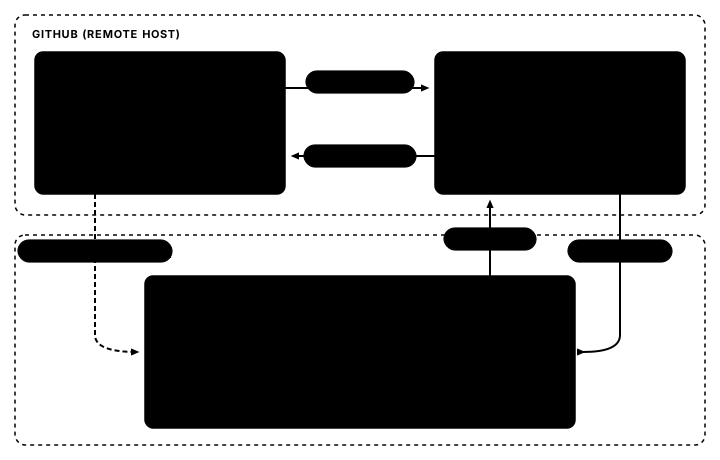
1. Fork the Repository
Since you usually don’t have write permissions to push code directly to someone else’s repository, you first create your own copy on GitHub:
- Navigate to the original project repository on GitHub.
- Click the Fork button near the top right corner of the page.
- Choose your account as the owner and click Create fork.
Now you have a duplicate copy of the repository hosted under your own GitHub profile (e.g., github.com/<your-username>/<repo-name>).
2. Clone the Fork to Your Local Machine
Next, bring that remote repository down to your computer so you can work on the code locally.
Copy your fork’s URL (via HTTPS or SSH) and run:
# Clone your fork to your local machine
git clone https://github.com/<your-username>/<repo-name>.git

# Navigate into the project folder
cd <repo-name>
Set Up the Upstream Remote (Best Practice)
It’s a good practice to link your local clone back to the original project (conventionally called upstream). This allows you to pull the latest changes from the original project while you work:
git remote add upstream https://github.com/<original-owner>/<repo-name>.git

# Verify that both 'origin' (your fork) and 'upstream' (original repo) are configured
git remote -v
3. Sync and Create a Working Branch
Never make your edits directly on the main or master branch. Always create a new, dedicated branch for your bug fix or feature.
First, make sure your local main is up-to-date with upstream:
git checkout main
git pull upstream main
Then, create and switch to a descriptive feature branch:
git checkout -b fix-error4. Make Your Changes and Commit
Now, write your code, test your fixes, and verify that existing tests still pass. Once you’re confident in your changes:
# Check modified files
git status

# Stage the modified files
git add `file-name`
# or stage all changes
git add .

# Commit with a clear, concise message
git commit -m "fix: short description of what you fixed"
5. Push Changes to Your Fork
Push your newly created branch and its commits to your fork on GitHub (referred to as origin):
git push -u origin fix-error6. Create a Pull Request (PR) for the Original Repo
Once pushed, head back to GitHub to open the pull request:
- Go to your fork or the original repository on GitHub. You will often see a banner pop up saying: “fix-error had recent pushes… Compare & pull request”.
- Click the Compare & pull request button. (Alternatively, go to the Pull requests tab of the original repo and click New pull request).
- Ensure the branch comparison is correct:
- Base repository: The original repository (
base: main) - Head repository: Your fork (
compare: fix-error)
- Base repository: The original repository (
- Fill out the title and description:
- Provide a clear summary of what you changed and why.
- Reference any related issues (e.g.,
Closes #1111orFixes #...).
- Click Create pull request.
7. Address Feedback and Iterate
Once submitted, the maintainers will review your PR. If they request any changes, you don’t need to close the PR or open a new one. Simply make the edits locally on the same branch, commit, and push again:
# Make required fixes, then:
git add .
git commit -m "refactor: short description on new edits"
git push origin fix-error
GitHub will automatically update your existing pull request with the new commits. Once approved, a maintainer will merge your pull request into the original repository.
Making that first contribution can feel daunting, but breaking it down into these steps makes the process approachable. Once you walk through the flow a couple of times, it becomes second nature. Just find an issue, follow the flow, and get your first PR merged!
Enjoyed this article?
Tap the clap button to show your appreciation!
Questions, feedback, or ideas? Sign in with your GitHub account to join the conversation.